5 Awesome Tricks To Speed Up Your Windows 10 Computer
5 Awesome Tricks To Speed Up Your Windows 10 Computer: Microsoft’s operating system has evolved a lot over the years, but you know, they always send us apps and “extras” that we do not always want to have. It’s these extras, looks and the way we install programs that slow down your computer.
Instead of taking the computer shop and having your computer/notebook formatted, let’s first try the steps below that should help a lot.
Related: How To Boost Your Android Gaming Performance With A Simple Trick
Table of Contents
1) Limit the opening processes of Windows
When we connect the pc, we want to be able to start using it as soon as possible. The opening of Windows 10 was actually faster, does not mean that is ideal. There is a trick we can perform, it will help remove third-party applications from system startup.
The antivirus is the biggest responsible for the initial consumption of processing, but unfortunately, we can not remove it, after all, if it is necessary. Well, let’s go to the steps, open the task manager by pressing CTRL + SHIFT + ESC. Or right-click the taskbar and the Task Manager button.

Task Manager
With the window open, click the Startup tab. After doing this, several applications will be arranged in a list, some enabled, some not. Disable anything you do not find necessary when opening the computer.
For example, in the image below I disabled Microsoft OneDrive. To do the task, right-click, and then click Disable.
2) Turn off search indexing
The Windows indexing system tries to scan all files, applications, and things you use to make the search easier when they are invoked. The process keeps running in the background, consuming resources.

Turn off search indexing
To remove, let’s go to the steps. Open the start menu and type index. You will see Indexing options. Click on it and the window below will open. Click the Modify button.

Turn off search indexing
In this window, we will be able to modify what Windows can or can not index in your searches. On the Change Selected locations tab, I advise you to remove everything. Thus, the computer will be free to identify only the start menu items and data of the local users. Which is relatively small and fast to process.

Turn off search indexing
Related: How To Increase Your Internet Speed With One Simple Trick
3) Disable visual effects
No video card on the computer? Disable visual effects such as window transitions. To do this, open the start menu and enter performance. Choose the option: Adjust the appearance and performance of Windows.

Disable visual effects
From the Open Performance Options screen, select the option “Adjust for Best Performance” under the Visual Effect section.

Disable visual effects
Now go to Control Panel and find the option Power Options, and click on it. Now choose the “Balanced (Recommended) option. Depending on the brand of your notebook, you may have more options.

Disable visual effects
Related: How To Find Direct Download Link Of Any Movie (Secret Trick)
4) Uninstall what you do not use
Always try to keep your hard disk drive clean. Sometimes, we install lots of apps on our system which tends to slow down the hard disk’s reading process. Therefore, make sure to uninstall the apps or games that you don’t use.
5) Remove Viruses and Spyware
For those who don’t use antivirus, here is the list of best free antivirus. Viruses usually, keep running in the background. We advise you to use a virus scanner and check the computer for viruses. The Malwarebytes program can help you to remove unwanted programs.
Related: How To Run Windows Programs Without Installing Them
6) Perform Disk Cleanup
To perform the Disk Cleanup you have to follow the steps we have given below:-
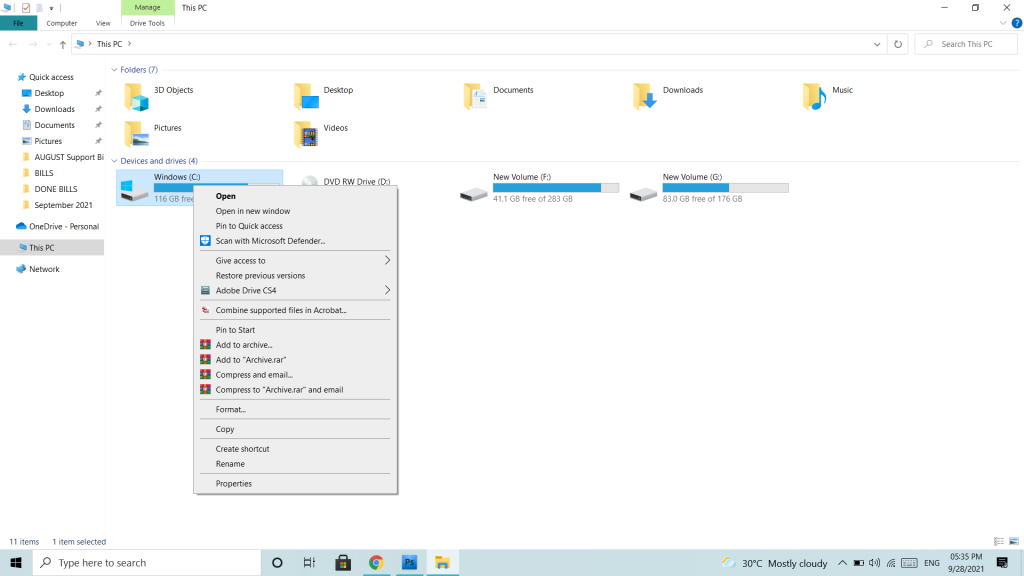
- Initially open your “Computer” icon from the desktop.
- Then you have to right-click on your “Drive C.”

- Now you have to select the properties from this menu.
- Once done, now you will get a dialog box like this.

- Then from here, you have to select the “Disk Cleanup” option.
- Now you have to select the “Cleanup system files” option.
 Once done now you have to select the “OK” option.

- That’s it now you are done.
Did you like the tips? comment if something has changed on your computer, and share with your friends to help them too.


