How To Fix Skype Problem With Playback Device In Windows 10
Fix Skype Problem With Playback Device In Windows 10: As we all know, right now the most used desktop operating system is Windows 10. Majority of the computer nowadays are running on Windows 10 operating system. Windows 10 is taking Microsoft to great heights. If you are running Skype on Windows 10 operating system, you might have faced the problem with playback device in Skype.
This skype problem with playback device is the fairly common experience and can restrict you from making or receiving skype calls. In this article, we are going to cover few sections regarding the problem with playback device. There are several factors which cause the irritating problem. Here’s how you can fix them manually.
Table of Contents
How To Fix Skype Problem With Playback Device In Windows 10
To start first let’s know several ways to fix the audio problem with playback device in Windows. This type of problems usually causes because of outdated drives. Therefore, the first best thing you can do is to check whether your sound card is working properly and is running with latest drivers.
Using Device Manager:
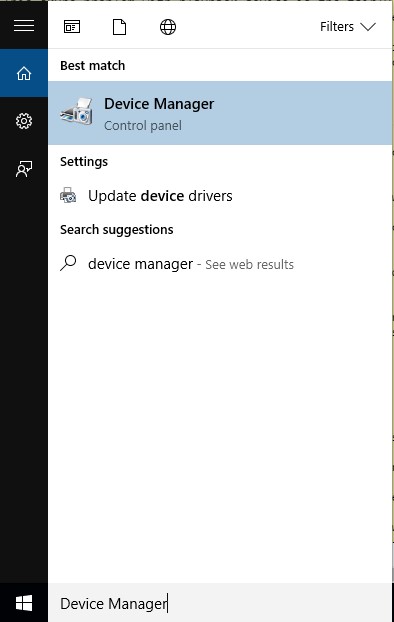
1) Open up the Start menu and then type “Device Manager”. Device manager lists all the connected hardware.
Fix Skype Problem With Playback Device In Windows 10
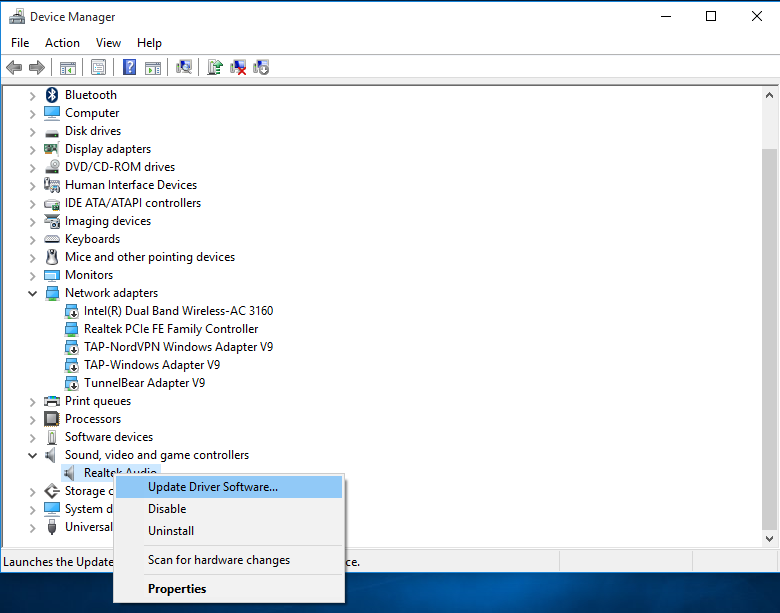
2) Here you need to find your Sound card and then right click and then click on “Update Driver“. Your operating system will now look for the latest driver if it manages to find any driver that needs to be updated it will do it for you automatically.
Fix Skype Problem With Playback Device In Windows 10
Running The Troubleshooter to Fix problem with playback device:
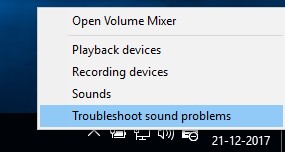
As we mentioned earlier, there are several options to fix the Audio issues in Windows 10. The another best method is to run the troubleshooter. Well, the troubleshooter can fix the problem in few seconds. The process to run Windows Audio Troubleshooter is very easy. You just need to right click on the Sound icon and then choose the option “Troubleshoot Sound Problems“.
Fix Skype Problem With Playback Device In Windows 10
This will fix the problem eventually. Windows Audio Troubleshooter is one of the easiest ways to fix the problem with the audio playback device. Windows have also published a video regarding how to troubleshoot an Audio problem. Here’s the video:
Now that we all know how to fix the audio problems in Windows 10. Let’s know how to fix Audio problems in different Apps. Like very often encounter skype problem with playback device windows 10. Let’s know how to fix that problem.
By Uninstalling The Device:
1) Open up the Device Manager, for that on the Windows 10 search box, type “Device Manager” and press Enter.

Fix Skype Problem With Playback Device In Windows 10
2) Now you need to locate your Audio device and then right click on it and then choose the Option “Uninstall”. This will uninstall the Audio device along with drivers.
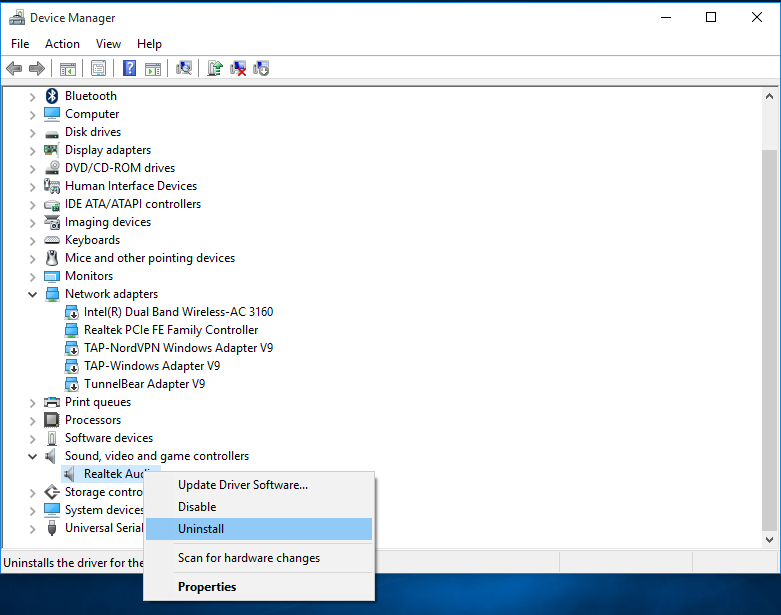
Fix Skype Problem With Playback Device In Windows 10
3) After uninstalling, restart your Windows 10 computer. After the Restart, you will see your operating system will automatically install the Audio device.
This will fix the problem with playback device skype windows 10. If the above method doesn’t work, let’s move to the next process.
By Disabling the Audio Device:
1) You need open up the device manager to disable the audio device temporarily, for that open the search and then type Device Manager and press Enter.

Fix Skype Problem With Playback Device In Windows 10
2) Now locate your Audio device and then right click on it and choose the option “Disable”.
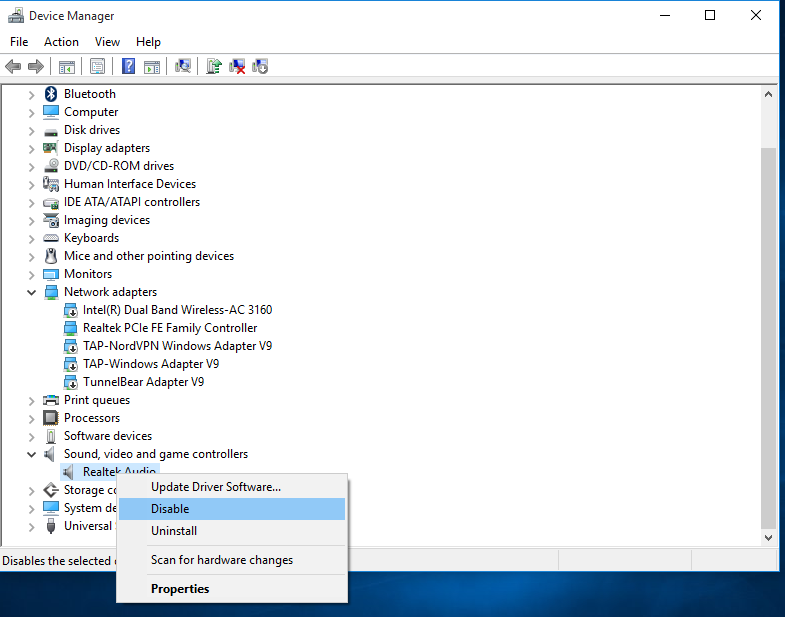
Fix Skype Problem With Playback Device In Windows 10
3) Again go back to the Device Manager, locate your Audio device and then enable it from the right-click menu.
This will fix the audio playback problem. Open up your Skype app and then check if the issue is resolved.
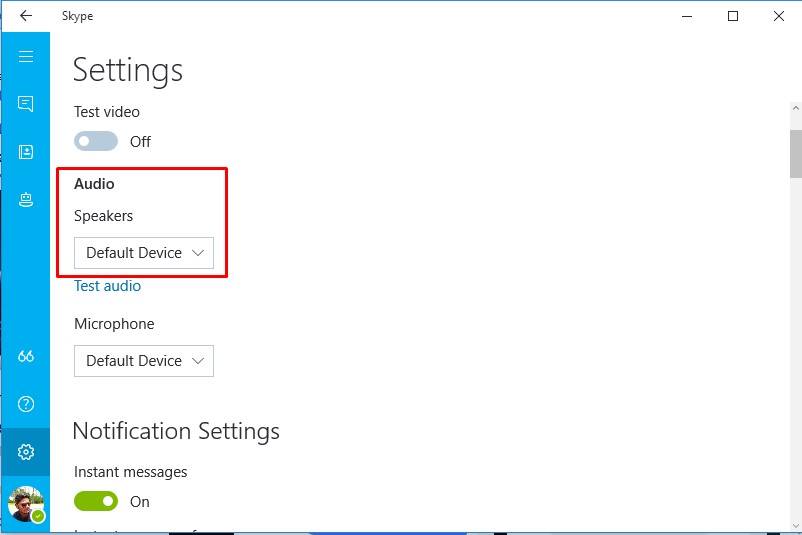
If the above problem still persists then open up the Skype account and then select the option Tools and then choose “Options”. Now under the Audio settings, you need to find the “Speakers”.
Fix Skype Problem With Playback Device In Windows 10
Check whether you have set the correct Audio device under speakers. This will fix the problem if it was related to wrong audio device settings.
Reset Skype Configuration:
The last option in the list is to reset your Skype configuration. Well, resetting the Skype configuration will help you to sort out the skype problem with playback device windows 10 and every other problem. To reset the Skype configuration file, follow up the simple steps listed below:
1) Close the Skype application from your Windows 10 computer and then restart your computer.
2) Press the Windows Key + R simultaneously and then enter “%appdata%” and hit the Enter button.

Fix Skype Problem With Playback Device In Windows 10
3) Now go to the directory, where you have installed the Skype app. Find the Skype folder and then rename it to “Skype.old”. As soon as you rename the folder, the message threads will be eliminated from Skype, but you can access it from the old Skype folder.
Open the Skype App and check whether the problem persists. Several users have also found that reinstalling the Skype program also fixes the skype problem with playback device. So, you could also try reinstalling and installing the Skype app.
So, if you are facing skype problem with recording device or playback device, you could follow all the above-given steps. We are sure, that this will help you to fix any sound related problems in Windows 10 computer. Hope this article helped you share it with your friends also.


