Fix Bootloader Preflash validation failed Error
Errors are not welcoming since they act like real headaches in our daily life. But, if anything unwanted happens without Android smartphones, then we do generally get panic about that. That’s what we are going to talk about in this article, how to fix the Bootloader Preflash Validation Failed error.
While apart from this, this error also known as by this error code or term:-
- Check Failed for Boot
Now without wasting much time, let’s be straight to the point since this will help you not to get bored and get the exact solution for this error.
Why does Bootloader Preflash Validation Failed error occur?

Bootloader Preflash validation failed
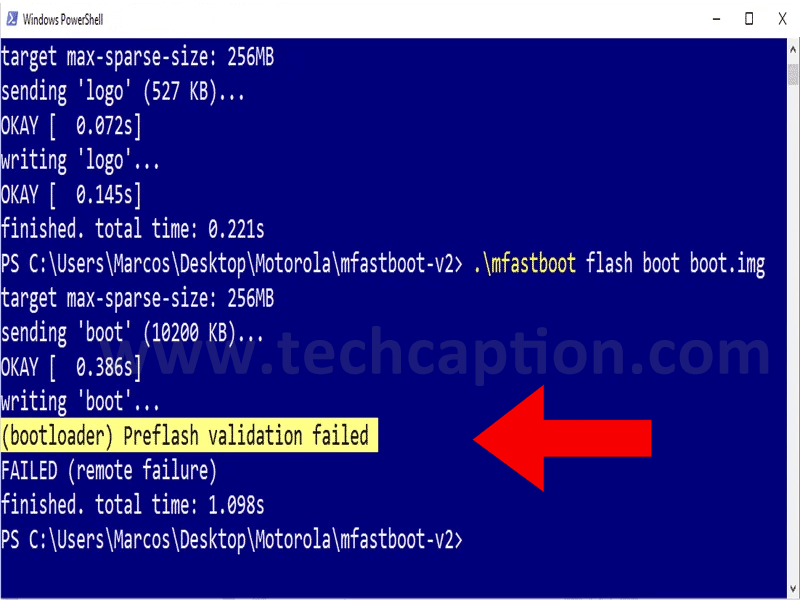
Bootloader Preflash Validation Failed is a very common error, and this error generally appears when users try to carry out a repair or update of the Android system through a PC or Laptop using the terminal tools.
Also Read: Is iPad pro waterproof or is the iPad Pro water resistant? (ANSWERED)
The answer to this question is very simple since the firmware that you are trying to put on your Android smartphone or tablet is not correct or either corrupted.
Due to which you may get errors on your PC or Laptop while flashing your Android device, and the error will appear like this:-

Bootloader Preflash validation failed
However, the fact is that why did the firmware file get corrupted? The exact reason could be several, but, among them, the general ones are like:-
- The file gets corrupted due to interruption during download.
- The file gets corrupted due to internet issues.
- The firmware file is available on the server for downloading is might be corrupted already.
Or else, for further reference, you can also recheck that whether you are downloading the exact or the right firmware file or not for your Android device.
Also Read: How To Fix OnePlus 8T Screen Display Problem
How to fix Bootloader Preflash Validation Failed Error?

Bootloader Preflash validation failed
In general, the answer to this question is quite simple, though it might look a bit complicated for many. But, here, you must know that which firmware exactly corresponds to your Android device.
And to do so, what you have to do is search for it and download it. So, if you have done everything correctly, then the whole updation procedure will not throw you any Bootloader Preflash Validation Failed error.
But, if you don’t have the right source to download the required firmware, then do by doing a few simple Google searches, you can find your required firmware for your Android device.
However, before downloading any files, you should remember that a bunch of files like this could endanger the security of your device and system, so, after downloading the file, you must scan the file that you have downloaded with your existing AV solution.
If the file set was malicious, then it could inject malware on your system and steal several important and crucial data like:-
- Device name
- MAC Address
- Credentials
- Saved file
- Bank Details
Apart from all these things, to fix the bootloader preflash validation failed error, what you have to do is follow these simple things properly, and here they are:-
- First of all, you have to download the exact or the right firmware file for your Android device.
- Then, scan the files that you have downloaded.
- Once done with the above step, now you have to update or flash your Android smartphone or device.
- To flash or update, you have to open your Laptop or PC with all the required files that we have mentioned above.
- Now connect your device to your PC or Laptop.
- Then open the PowerShell terminal on your system after connecting your Android device.
- Now, put all the firmware files in a single folder from where you are operating.
- After that, you have to start the update or flash procedure and wait for the flashing to get completed.
- That’s it; now you are done.
Also Read: What is com android providers media or com.Android.providers.media?
Note: This whole procedure doesn’t involve any extra steps or files; in short, you have to follow the steps properly and take care of the firmware files that you have downloaded before flashing or updating your Android smartphone or tablet.
So, if this piece of content is useful to you, then do remember to help us by sharing this content more and more, as this helps us to stay active and create such guides for the users like you or the users who are already in need of guides like this.
![PowerPC Applications Are No Longer Supported Error [Fixed]](https://techcaption.com/wp-content/uploads/2019/06/PowerPC-Applications-Are-No-Longer-Supported-Error-Fixed-370x194.png)
